Sunday, October 31, 2010

Wrapping Up


I'm putting the final touches on my last painting for the LeBasse Show next Sat Nov 6th. The most enjoyable part of the painting:) I'm really looking forward to having a little r&r while visiting Cali for the show. For once I'm not packing up all of my art supplies. Just my sketch book to work on new ideas.

Friday, October 29, 2010

First Post

Hi Everyone. I just wanted to redirect you to my first post on MuddyColors hope you enjoy... or at the very least don't hate it;)

Monday, October 25, 2010

Muddy Colors Blog

I'm participating in a artists collective blog called, you guessed it, Muddy Colors. It was Dan Dos Santos' idea to gather up an eclectic group of professionals in the field to give info, feedback, share progress shots, new work etc. It's a killer line up that I'm honored to be a part of. So check it out. Some cool posts are already up.

Wednesday, October 20, 2010

What Motivates you to be an Artist?

Fame? Money?(ha!) Or maybe you just can't help yourself? The lecture addresses motivation in general. Being a successful artist, or doing anything well is touched on towards the end. A great listen while working on your art ...well, I liked it.
http://www.youtube.com/watch?v=9j2aTwNor5k

Sunday, October 17, 2010

A Question about paint

"Hey Eric,

I am a huge fan of your work! Your work is very inspirational and has
changed the way I look at illustration all together. I was wondering
if you could advise me in what certain brands of acrylic paint to use?
I've tried a lot of different kinds and I keep seeming to pick brands
that lose a lot of pigment and just look really flat when dry.
Anyways, if I could get your advice on the ordeal, that would be
fantastic!"


Honestly, I haven't done a lot of experimenting comparing various brands of paints. I mostly use "Liquitex, Soft Body" acrylics. I think it started when I found out a favorite illustrator of mine ,JJP , used them. I've had success with "Golden" brand as well. I've even had success with student grade acrylics that I didn't want to waste. So to an extent I'm not sure how much of a difference they make. I doubt it would make or brake a painting. I have had friends buy and use pre-gessoed canvas boards and paint that should've been on permanently would be wiped off due to more brushwork. That may have been a cheap gesso problem. Not sure.

Back in the day when I was at CCAD I heard people tell of some "secret" pencil that Pete DeSeve would use to draw with. I just didn't get it. I doubt a secret pencil is the reason for the skill and creativity behind such an artist. I'm sure Pete would draw circles around most with a burnt stick.

I'm not sure if you mean "flat" as in the rendering of the piece or the surface of the paint. Painting thin leaves a piece with a matte finish similar to watercolors. A thicker application, as I've been painting recently gives a more glossy sheen. If surface is the problem, using a satin or glossy varnish at the end of your painting will unify the surface and give it the desired sheen.

It's hard to give advice on your problems without seeing the work. Color being relative, perhaps using more muted colors adjacent to your chromatic areas will be a way to help accentuate your color more. If you think of some of Chuck Close's paintings they are realistic at a distance. But up close they are blocks of color. Not unlike a monitor or tv screen. So placing the perfect color in the perfect spot is a major factor in a successful painting. Hope this helps.

Friday, October 8, 2010

A little process


I just posted a new painting video. So I thought I would go through and kinda breakdown what exactly is happening. Watch video here.

Materials- Acrylic, water, gessoed canvas, good lighting

Before we get started let's revisit the basic steps from start to finish.
-thumbnails(if working on a commissioned job this is where you would want to do your research for ideas)
-refined sketch
-value study, color study
-photo reference for some reason people always fight this.
-final drawing using ref
-paint, paint, paint


Goals in this vid:

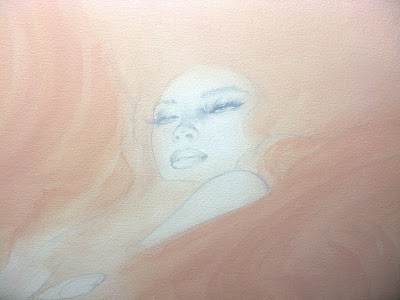
The drawing is down and I just started applying some paint before recording. Right now I'm trying to stick with larger brushes so that I don't get sucked into doing detailed work too early which, as fun as that can be, really slows things down and then sometimes gets covered up when it's all said and done.

Using water I mix my paint to a "melted ice cream" consistency. This is thicker than when I work on paper and to be honest I'm still trying to adjust to it. I'm started out with lighter colors and slowly darkening as I go. I have two brushes. One I use to apply paint to a section and another to brush and feather out any streaks or inconsistencies. I try not to cover too large of a section because I don't want parts starting to dry before I can feather it out. So I brush feather brush feather and work around the canvas. You can do this in larger sections or using smaller brushes do more detailed feathering. Right now I'm doing general coloring and suggesting some contours but everything is pretty soft and feathered. I plan on tightening up closer to the end.

I started with a small bowl of warm parchment colored mix. After going over the surface where needed I mixed in some reddish and yellowish colors to slightly warm up and darken the mix and continued painting. Added some more reddish colors and repeat, slowly working in darker and darker. Dark is relative since the piece in it's essence will be a mid/high key piece. That's basically where I'm at with this painting.

I'm usually worried I'll losing my drawing. I'm trying to let go of that a bit and I think it's helping. I can still see suggestions of most of the line work through the paint. At the same time losing some edges give the piece a more spontaneousness that is appealing. At one point I did take the darkened mixture and reinforced some of the line work to ensure that I didn't lose it completely. So far so good.

tips- the right brush for the right job. If your painting a large area it helps to have a large ass brush. Size does matter...or at least can be very useful at times.

Also, the concept, composition, drawing are the foundation of your work. So to have great technique and a weak concept, composition etc will only go so far. So don't neglect these important factors when creating. Hope this is helpful.

Monday, October 4, 2010

Final peek


Actually finished this piece and shipped it and few others out to the gallery. Moved on to new work and trying speed things up. Gallery show about a month away...

Saturday, October 2, 2010

Reproductions...

"Hi mate, I love this.
I have a technical question if you don't mind. What scanner do you use to scan the your artwork to computer? Coz I notice the you paint things in big format.Thx"


Previously I would use my 8x11" scanner which worked fine for most jobs. Piecing a few scans together started to be troublesome with the larger works. Eventually I knew I needed to upgrade to a large format scanner or a nice digital slr camera. I decided to get the new camera. I"m not the best photographer(understatement)so of course I had to do a little research on lighting art and what lens are good for what. After asking a few friends who used cameras to shoot reproductions of their artwork I went for the Canon 50D 15.1mp. I also had to invest in proper lighting equipment which can add up in cost. However, I don't feel limited by size and in the long run I know I'm saving tons of money by doing the repros myself. It's also nice to be able to help friends out with their own repros:)

I usually shoot work in two pieces and a quick photomerge in photoshop to piece it together gives a pretty flawless image.

Also, don't forget any equipment you buy for your art is a tax write off!